Note: To learn how to use Rank Tracker with the Big-G Stealth Extractor click here.
This solution has been tested for Rank Tracker v7.3.12.
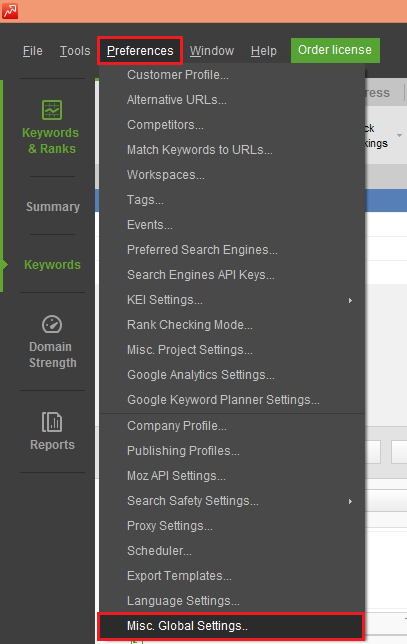
Step 1 - Click on the Preferences Menu and select 'Misc. Global Settings' to pull up Rank Tracker's settings window.

Step 2 - Adjust the 'Number of Tasks' Rank Tracker can Perform
To configure Rank Tracker for use with multiple TrustedProxies' proxy servers, the first thing you should do is adjust the number of tasks Rank Tracker can perform at once.
Generally speaking, you should have an equal number of tasks for the number of proxy servers you have in your software. Example: If you have 5 proxy servers, you can safely run up to 5 simultaneous tasks. The maximum number of simultaneous tasks Rank Tracker allows is 25.

Step 3 - Disable Search Engine Data Center Rotation
To use Rank Tracker with rotating proxies, you must disable Rank Tracker's own data center rotation. This setting is not compatible while using proxy servers.
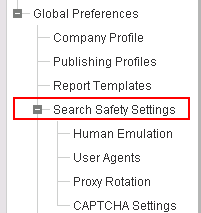
1. On the settings screen, click the "Search Safety Settings" heading in the list on the left to bring up Rank Tracker's general Search Safety settings.

3. Uncheck "Enable rotation of Search Engine Data Centers"

Step 4 - Enable Random User Agents
User Agents allow Rank Tracker to mask your queries as if they originate from multiple computers and customers. You should enable random rotation of user agents when using proxy servers.
1. Under "Search Safety Settings" in the list on the left, click on "User Agents."
2. Click "Use random user agents"

Step 5 - Human Emulation Settings

Step 6 - Add Proxy Servers
Once you have selected the Number of Tasks you wish Rank Tracker to perform at once, it's time to add your TrustedProxies' proxy servers.
You can add these Proxy Servers one at a time, or if you are adding a large group of proxy servers, you may choose to Import them in bulk. If you want to add multiple proxy servers at once, skip to the optional "Add Proxy Servers in Bulk" section below.

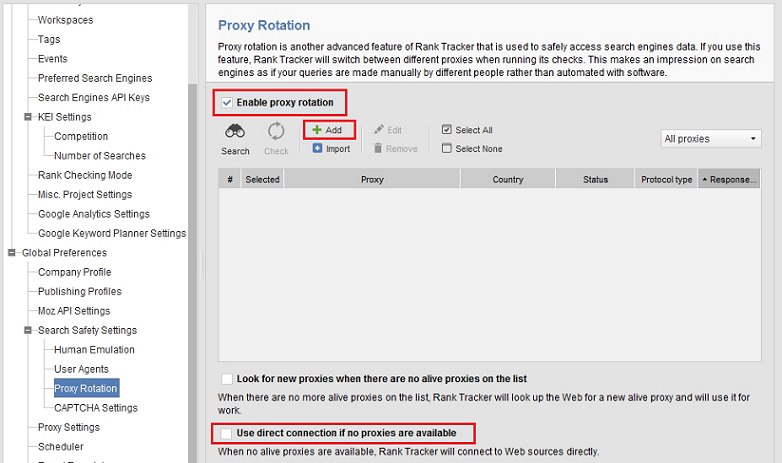
1. Click the "Preferences" menu and then click the "Search Safety Settings" and then the "Proxy Rotation..." menu.
2. Check the "Enable proxy rotation" box.
3. Uncheck the "Use direct connection if no proxies are available" box. This will prevent your own IP address from being picked up by search engines and potentially banned.
4. Click the "Add" button.
5. In the "Address:" field type in the IP Address of your TrustedProxies' proxy server. This will be a four-part number such as: 127.0.0.1
6. In the "Port:" field, enter 80 - the default HTTP port - or a custom port if you were assigned one.
7. If your TrustedProxies' proxy server requires Authentication, check the "Proxy requires Authentication" box, otherwise Skip to Step 9.
8. In the "Username:" field, enter the username you were assigned by TrustedProxies.
9. In the "Password:" field, enter the password you were assigned by TrustedProxies.
10. Click the "OK" button.
Step 7 - Ensure you are using the correct number of Search Engines
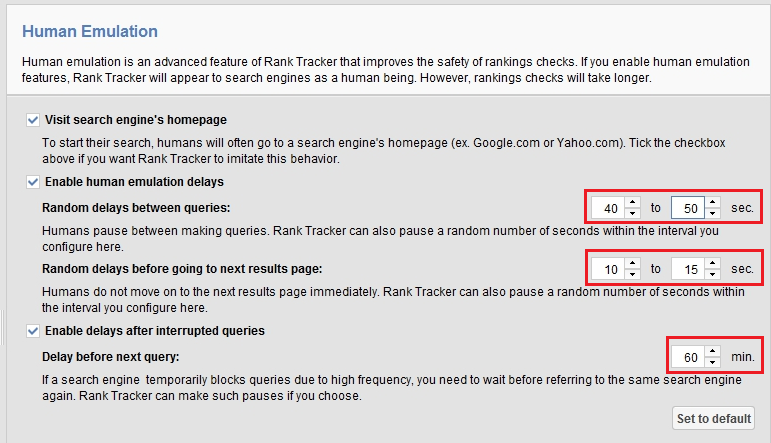
Rank Tracker's human emulation settings depend on the number of search engines that you have configured in your software. Basically what this means is that the human emulation setting delays are going to be multiplied by the number of search engines that you have enabled.
For example: The above human emulation settings specify 15 to 20 seconds, but that is much too quick to access Google. The way to get around this is to configure multiple search engines in your copy of Rank Tracker. If you have Google and Yahoo configured, it will spend 15 to 20 seconds on the Google query and then spend 15 to 20 seconds on the Yahoo query. The net result is that Google will be accessed every 30 to 40 seconds, which is a safe delay that will prevent Google from blocking your proxy servers, resulting in unfinished or delayed reports.
We recommend that you have a minimum of two search engines configured in Rank Tracker at all times. Using a single search engine with the default delays will result in banned proxies.
Optional - Add Proxy Servers in Bulk
If you are going to be adding a large number of proxy servers to Rank Tracker, it's a good idea to add them all at once rather than add each one manually. Follow these time-saving steps to add all of your TrustedProxies' proxy servers in bulk:
1. From the settings screen, under "Search Safety Settings," click on the "Proxy Rotation..." menu.
2. Check the "Enable proxy rotation" box.
3. Click the "Import" button.
4. Copy/Paste the list of proxies assigned to you into the "Please enter the proxies you want to import (one entry per line):" box. The proxy servers should be entered one-per-line, in a "hostname:port" format. e.g: If you were assigned proxy server 127.0.0.1 over port 80 you would enter: 127.0.0.1:80.
5. Click the "Next" button. It will begin checking the proxy servers.
6. Once it's done, click "Finish" and then click "Okay."
